


Welcome back!
Unbelievable! This past weekend we wrapped up our last quilt show of the year! Had a wonderful time vending at the Village Quilters of Lake Bluff Quilt Show. And guess what? I won the beautiful raffle quilt! What an honor! What a way to end this year’s show schedule!
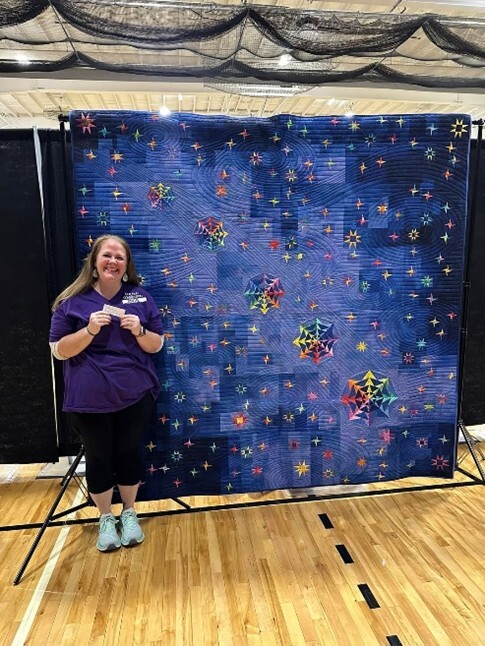
If you’re local, stay tuned … I’m going to hang this gorgeous quilt in the shops for all to appreciate.
Will let you know where and when it’s on display!
So, I mentioned that this was the last show of the year. We’re drifting from a lovely fall into the cold temperatures of winter. (Had to scrape my car windows last week!) With that cold weather comes the desire to wrap up in a warm and cuddly quilt!
A big part of what makes that quilt so warm and cuddly is its batting … that unseen but so important inner layer of a quilt. So today, let’s talk about the types of batting, how to choose which type is right for your quilt, and what you need to know from a longarm quilting perspective.
Quilt Batting Basics
What is batting?
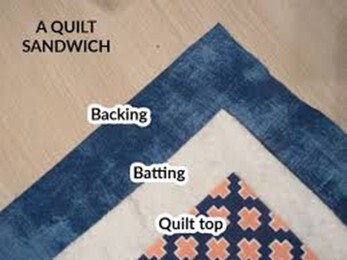
Okay, so we know that batting is the middle layer of the quilt that nestles between the quilt top and backing fabrics. And that unseen layer is so important. It provides your quilt with warmth (or temperature regulation), loft, texture and structure.
But the type of batting you choose impacts all those factors. So, let’s explore what you need to know about the main types of batting used in longarm quilting so you can make the best choice for your quilt.
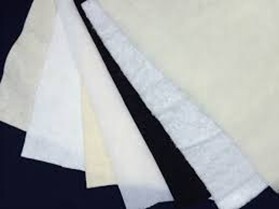
Types of batting and their uses
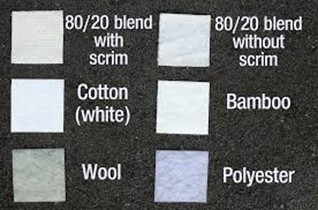
Cotton Batting
Cotton is a natural fiber. This type of batting is often used for traditional or heirloom quilts as it handles dense, tight quilting well.
Cotton batting is soft and breathable. It drapes well and is easy to quilt. It also provides a mid-range of warmth. Our supplier, American Fiber Products, recommends maximizing your quilting at 10” apart, but read the label that comes with your batting to verify its requirements.
What makes cotton a little tricky is that it tends to have a higher shrinkage rate. If you prewash your cotton fabric, but not the batting, you’ll end up with a more crinkly, antique looking quilt after washing it. (More on that coming.)
Cotton also provides less loft … it’s a thinner batting. And depending on the size of your quilt, it may feel heavy.
Cotton/Polyester Blend (Usually 80% Cotton/20% Polyester)
80/20 is one of our two ‘go-to’ battings at The Quilting Connection! It’s perfect for everyday quilts. It’s a very versatile batting, longarm friendly, and an economical option.
This batting combines the softness of cotton with the stability and increased loft of polyester. Shrinkage is minimal when you wash it, and it's strong which makes it great to use in larger quilts. American Fiber Products again recommends a maximum space of 10” between your quilting.
You may find quilts made with 80/20 batting slightly less breathable than those made with an all natural fiber such as cotton.
Polyester Batting
Poly batting is our other ‘go-to’ batting. Modern quilts, wall hangings and quilts that will be washed frequently are good candidates for polyester batting.
A lightweight batting option, poly resists wrinkles and shrinkage. It usually has a higher loft so it shows the stitching of your quilt design nicely. It's strong, durable and holds its shape well. It's also an economical batting option.
Poly quilts can be very cuddly, but they can also be very warm. Polyester doesn’t have the breathability of natural fibers … something to consider for summer quilts or for quilts being used in warmer climates.
Poly doesn’t always drape as nicely as other options. And you can’t apply heat or iron quilts using polyester batting as it melts. If you give quilts as gifts or make donation quilts, make sure to add this information to your quilt label so the recipient knows how to care for the quilt!
If you want to use different top and bobbin threads, consider using a higher loft polyester batting. The added thickness of the poly gives you more leeway for burying the locking of your two different threads within the batting.
Bamboo Batting
This one’s my favorite! Bamboo is another natural fiber. It's eco-friendly, soft, breathable and drapes beautifully! (Feels just like you’re getting a hug!) It also washes well and resists bacteria. This is the batting to use for summer / warm weather quilts … it has a wonderful cooling effect.
American Fiber Products recommends that your stitching be a maximum of 8” apart.
Because it’s a natural fiber, you may experience some shrinkage, but not as much as 100% cotton. It's also another thinner batting. Finally, it's also more expensive, and it may be more difficult to find. (But we do carry it at The Quilting Connection!)
Bamboo/Cotton Blend (50% Bamboo/50% Cotton)
Because this is a blend of bamboo and cotton, it’s another natural fiber batting. It's a little thinner than 100% bamboo but maintains most of its characteristics. Because it’s a blend, it’s also a bit more economically priced.
Wool Batting
Wool is warm and temperature regulating yet lightweight. It has a higher loft, giving your quilting excellent stitch definition. It's often used in heirloom and winter / cold weather quilts. Tip: If you choose to use wool batting, make sure it's washable wool.
Wool batting is more expensive. Check your washing instructions and remember – no heat when drying as it can felt the wool. Again, if you use wool batting for a gift or donation quilt, note this information on your quilt label so the recipient knows how to care for the quilt!
Those are the most commonly used types of batting, and the types we carry at The Quilting Connection. Other types of batting include silk, recycled, fusible and soy.
For more information on all these battings, check out the Quilting Central Podcast Episode 9: Batting & Beyond. Julie, Cathy and I talk about and show you samples of several types of batting as well as provide you with additional batting-related tips and some mistakes to avoid.
So, now that we’ve covered the basic types of batting, let’s look at how it’s sold and how to prepare it when longarm quilting.
When You Buy Batting
Just like I’ve noted when buying fabric, buying quality batting matters! For the best longarm quilting experience, you want both the material used and the loft to be consistent. (And remember, quilt shops carry the highest quality products, unlike big-box or discount stores.)
Whenever possible, buy your batting off the roll. Not only can you get a cut the size you need for your quilt, but you can inspect the batting as it comes off the roll. Rolled batting usually comes in widths of 96” or 120”.
Prepackaged batting may be a better option for you when you need a smaller cut. The challenge is that you don’t get to inspect the batting before buying it. Once opened, it’s yours even if it’s flawed. Again, buy high quality quilt shop batting if possible when taking this route.
Preparing Your Batting for Longarm Quilting
Remember to:
Measure generously. Just like your backing fabric, your batting should be four to six inches larger than your quilt top on all four sides. This allows for shifting that can occur during quilting, the space needed by your longarm and its frame, and ‘shrinkage’ during quilting.
Remove any creases or folds. This is primarily an issue with packaged batting. Remove it from its packaging and place it in your dryer with a damp wash cloth for 5 – 10 minutes. Another option is to lightly steam your batting as you load it on your longarm.
Check the grain of your batting. Yes, even batting has a grain! If you gently tug on a small section of your batting, you’ll find one way gives a little more than the other. If you’re quilting a piece that will hang, you’ll want to minimize the chances of your finished quilt sagging. Place your batting so that the direction that has less movement hangs vertically and the direction that has the most stretch hangs from side to side. (For more explanation and a visual, see the Quilting Central Podcast Episode 9: Batting & Beyond, 16 minutes in.)
Make sure the right side of your batting is facing up and the wrong side is laying against the backing fabric.

- If you’re using a needle-punched batting (batting that was created by fibers passing through a machine with thousands of tiny barbed needles mechanically felting the fibers together), the right side of your batting will have slight dimples in it and the wrong side will have small pills (or pimples). Load your batting with the dimple side up.
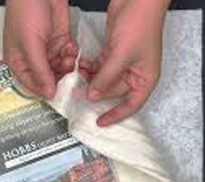
- If you use batting with a scrim (a thin, delicate layer of stabilizer on one side of the batting), place the scrim side down against the backing fabric. The scrim may give a smoother feel to one side of the batting. Often you can separate the scrim from the batting itself at one corner to confirm which side the scrim is on.
Consider your color options. Batting is generally available in white, natural and black.
- If your quilt fabric includes a lot of white, you’ll probably want white quilt batting. Using natural or cream-colored batting can show through enough to give your quilt an antique look.
- If your quilt fabrics are primarily black or deep colors, consider using black batting. If the needle pushes through any batting while quilting, it won’t be noticeable like white or natural.
Prewash your batting. If you are using cotton batting and you prewashed the fabric of your quilt, consider prewashing your batting too. To do this, soak your batting, spin out the excess water, and then air fluff it in your dryer. This will reduce (not eliminate) shrinkage when you wash your completed quilt.
A Few Final Batting Related Tips and Considerations
Batting density may impact tension and stitch quality. You’ll have to experiment with different types of batting to see how your machine reacts and what adjustments you need to make.
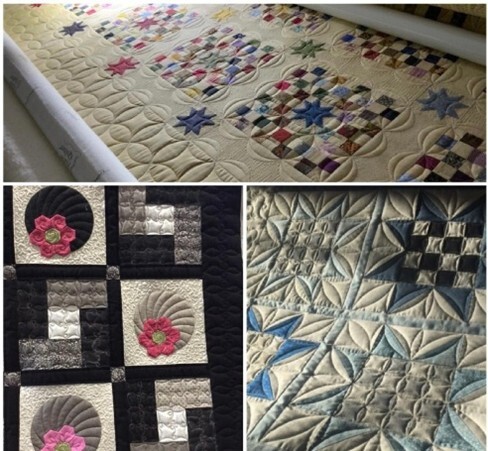
Batting loft impacts the visibility of your quilting design. A low-loft batting will give you a flatter, more traditional look that emphasizes your fabric and piecing. High-loft batting will create more texture and show off the quilting design.
High batting loft may decrease the finished size of your quilt. A thick, fluffy batting will ‘pull in’ fabric as it is being quilted. The denser your quilting design, the more likely you’ll ‘shrink’ the size of your finished quilt.
Batting stability impacts loading and advancing. Stable battings (cotton, bamboo, blends) are easier to load and keep smooth on the frame. Less stable battings (wool and some high-loft poly) needs extra care and attention when loading and advancing your quilt.
Stitch density impacts the amount of warmth provided by your quilt. Batting generates warmth by holding pockets of air within your quilt. A dense quilt design uses more stitches. The more stitches in your design, the less opportunity for the batting to trap pockets of air. Your quilt won’t provide as much warmth.
Layered batting provides more options. Here are just a few examples.
- If you want the quilting definition of wool, but also want more stability, place a layer of 80/20 batting under your wool batting.
- If you want more quilting definition and your quilt has a lot of white fabric in it, place a layer of poly batting on top of a layer of 80/20.
- If you want to use different types or colors of thread on your quilt top and in the bobbin, double layer your cotton, 80/20 or bamboo batting to ensure the threads will lock together within the batting.
Smaller pieces of batting can be pieced together for larger projects. Create a ‘frankenbatting’ by piecing together smaller, left-over pieces of batting. When you buy large cuts of batting, there’s a good chance you’ll have extra left over. Sometimes that extra batting is perfect for a smaller project, but if you’ve accumulated several leftover pieces, consider piecing them together for a larger project.
- When creating your frankenbatting, make sure all your pieces are the same type of batting. Then make sure the right and wrong sides match. (For example, if your batting is needle punched, make sure the dimples are all on the same side.)
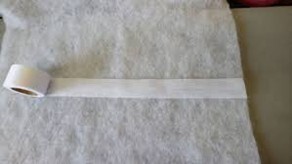
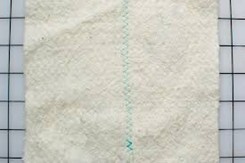
- You can join your smaller pieces together in a few ways. You can buy fusible tape. (Remember, don’t iron poly batting!) You can zig-zag pieces together. Or you can nest the edges of your smaller pieces together as you quilt.
Did you learn something new about batting? Did something catch your attention?
Next step? Experiment! Try different types of batting or different combinations. Learn how your longarm works in a variety of circumstances. Be creative! Have fun! And please share your discoveries and any questions!
Okay, time to see what else is happening at The Quilting Connection!
In-person Classes
I’ve listed several popular classes below. Please note that they are all sold out at this time, but I’d like to share a sample of what will be available again in the future.
Especially stay tuned for Wendy Fuller’s free-motion and ruler classes. We will be offering this series again in the spring, probably in the March, April and May time frame. I’ll let you know as soon as we have dates on the calendar!

Feathers Flowers and Leaves Class with Wendy Fuller
Friday, November 7, 2025 (Appleton) SOLD OUT
or
Saturday, November 8, 2025 (Elkhorn) SOLD OUT
Ruler and Gridwork Class with Wendy Fuller
Friday, November 21, 2025 (Appleton) SOLD OUT
or
Saturday, November 22, 2025 (Elkhorn) SOLD OUT
Superior Hands-on Thread Class
Saturday, November 15, 2025 (Elkhorn) SOLD OUT
or
Sunday, November 16, 2025 (Appleton) SOLD OUT
10:00 AM – 4:00 PM
In this FREE class Micki will teach you that you CAN use all different kinds of threads on your domestic or longarm machine!
You’ll make projects to learn new techniques! And we’ll provide all the fabrics and threads.
Just bring your domestic sewing machine!
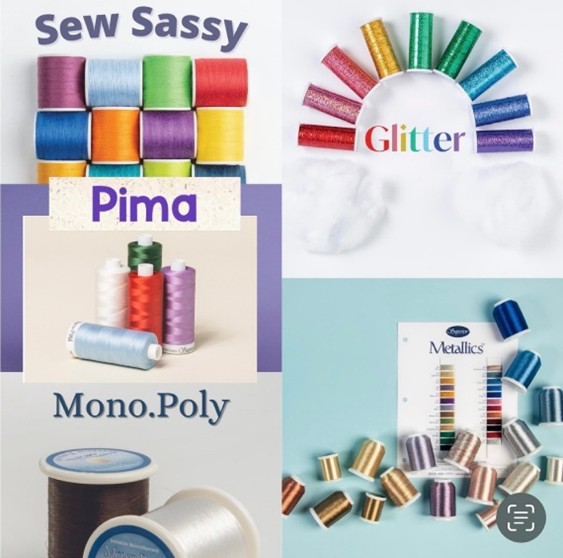
Micki will show you how to use Pima cotton, Sew Sassy, Metallic, Glitter, and MonoPoly threads!
You can do it!
Again, these popular classes are all currently full!
I’ll let you know as soon as more classes are scheduled for early next year!
Feel free to check out the Classes page of our website to catch updates as they develop.
Upcoming Events
APQS Road Shows
If you’re interested in learning all about longarm quilting and the APQS machines, these Road Show events are the way to go! We’ve held several at both our Elkhorn and Appleton locations, and the quilters that attended them loved them!
Now we’ve got two more scheduled in other Wisconsin locations!

Hands-On Longarm Quilting Class and Roadshow:
Explore, Create and See what machine is right for you!
Date: Wednesday, 11-19-25
Location: Holiday Inn Eau Claire
4751 Owen Ayres Ct.
&
Date: Thursday, 11-20-25
Location: DoubleTree by Hilton – Madison East
4402 E Washington Ave.
Time: 10:00 AM – 3:00 PM
Cost: FREE!
Join us for a fun, hands-on day exploring the world of longarm quilting! This class is perfect for anyone curious about using a longarm quilting machine—whether you’re brand new or just want to get more comfortable with the features and capabilities.
We’ll start by walking through the key features of the longarm machine, including: threading, tension, and stitching options. You’ll get plenty of hands-on time to practice and see how easy and enjoyable quilting can be on a longarm.
Then, put your new skills to use with a make-and-take project that you’ll finish during class and take home with you! All materials are provided—just bring your enthusiasm and creativity.
PLEASE NOTE, even though these classes are FREE, we ask you to register so that we know how many will be attending. We want to have enough class materials on hand!
When you click one of the above links, you will be taken to an APQS webpage as they monitor the registration counts.
Distributor Sales!
Handi Quilter

Have you been waiting to buy your dream Handi Quilter longarm? Now’s the time!
Handi Quilter is offering show pricing now through December 1st!
Please contact us for more details!!!
The Quilting Central Podcast Update
Have you caught the latest episode of The Quilting Central Podcast? The 3 of us got to be live and in person together for this episode! It was so much more fun to be together!

Check out Episode 13: “How We’d Quilt It: Thread, Designs & Fixes for Tricky Quilts”. Julie, Cathy and I walk through exactly how we’d quilt a variety of real quilts – from design choice to thread selection to practical fixes when things don’t go as planned.
We cover:
- How to pick the best thread for quilting (cotton vs polyester, weight, color choices)
- When to use free-motion quilting vs. pantograph / edge-to-edge quilting
- Matching quilting designs to quilt style, scale, and piecing
- Real-world strategies for wonky borders, damaged tops, and uneven blocks
- Tips for quilting for hire: managing customer expectations, notes to leave, and problem-solving on the clock
- Shop-tested tools, favorite threads, and finishing touches that make a quilt sing
Whether you quilt at home or quilt professionally, you’ll walk away with clear decision-making steps and practical fixes you can use on your next project.
For a complete listing of all our episodes, check out the Quilting Central Podcast YouTube channel! Be sure to subscribe and comment. We’d love to hear your thoughts!
That’s it! As always …
Please remember, if you ever have ANY questions or want additional information about ANY of the products and services we offer, please call us at (262) 723-6775 or email us at info@QuiltingConnection.com.
You can also visit us online at QuiltingConnection.com or in person at 21 Adams Street in Elkhorn, WI (usually M-F 9-4, please call to confirm we’re open) or 1017 W. Northland in Appleton, WI (W, Th & F 10-4, S 10-3).
Finally, check out our blog at QuiltingConnection.com/blog and our Facebook posts.
And please share your thoughts and questions. I’d love to hear from you!
Angie